
Pond-water microscopy guide
Pond water under a microscope
Pond water can contain a shifting community of algae, protists, tiny animals, and debris, making every carefully prepared slide a new observation.
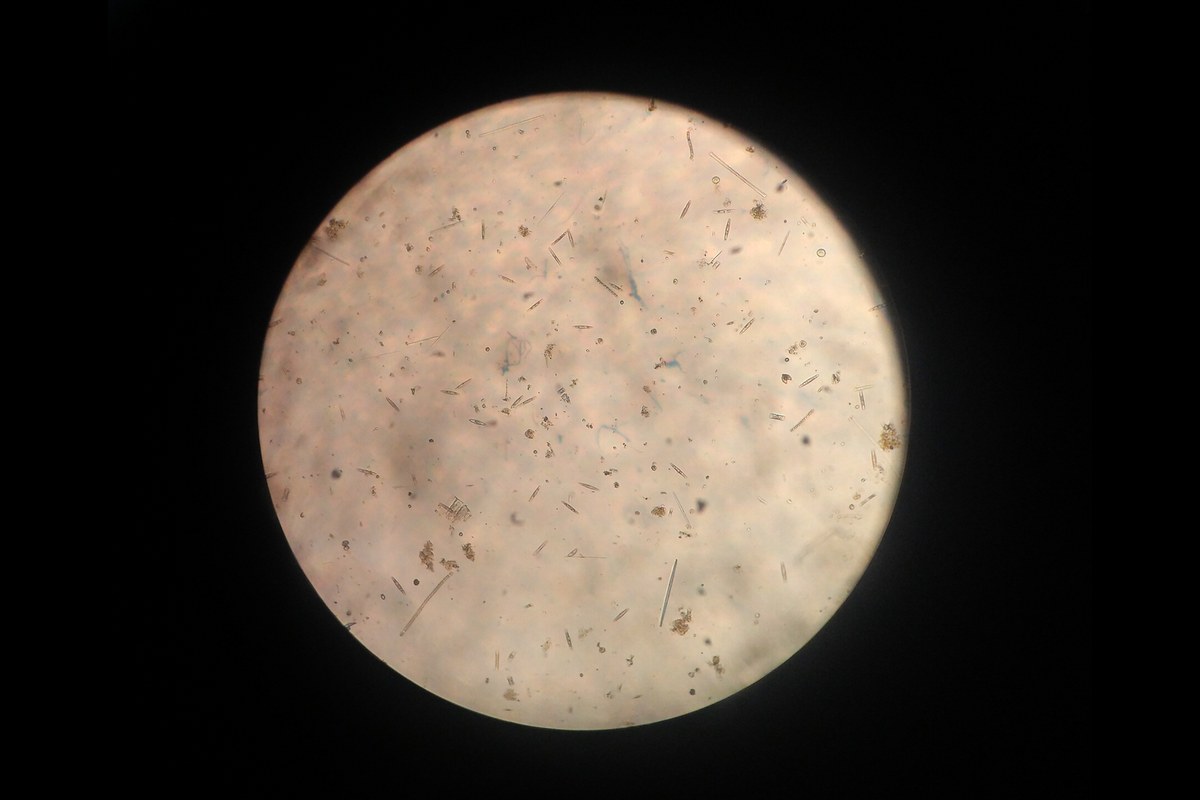
Know what a pond-water slide can show
Looking at pond water under a microscope is a useful first investigation because the sample may contain objects with very different sizes, shapes, colors, and movements. Depending on the location and season, a drop may include algae, protozoa, rotifers, tiny crustaceans, nematodes, plant fragments, pollen, mineral grains, and air bubbles. Another drop from the same container may look entirely different.
These observations do not establish whether water is safe to drink, swim in, or use for any medical or environmental decision. Many microorganisms cannot be identified reliably from appearance alone, and some important organisms are too small or require specialized methods. Treat the activity as an exploration of visible structure and behavior.
Collect a small sample thoughtfully
Ask permission before collecting from private property, parks, school grounds, or protected areas. An adult should supervise children near any body of water. Collect from a stable, reachable edge; do not wade into deep water or lean over an unsafe bank.
Use a clean, leak-resistant container and a disposable dropper or transfer pipette. A sample taken beside submerged plants or containing a small amount of loose bottom material is often more visually varied than clear surface water. The University of Wyoming's introductory microscopy laboratory specifically directs learners to mix the sample and collect some material from the bottom before making a slide.
Keep the project small. A few tablespoons are enough for many slides. Label the container with the location and date, keep it closed during transport, and keep hands away from the mouth and face. Avoid water near a visible algal bloom, sewage discharge, chemical spill, heavy animal waste, or other obvious contamination. Do not drink the sample.
For classroom work, follow the instructor's safety and disposal rules. At home, protect the work surface, wash hands with soap and water after handling the container or slides, and do not intentionally incubate an unknown environmental sample.
Prepare a pond-water wet mount
You will need a clean slide, cover slip, dropper, lens-safe cleaning material, and a compound light microscope. Safety glasses are a sensible choice during preparation, and the University of Georgia Extension pond-life activity includes them in its materials list.
Make the slide one step at a time:
- Gently mix the container so settled material is suspended without shaking it into foam.
- Draw up water from near a plant fragment or the lower part of the container.
- Place one small drop in the center of a clean slide.
- Hold a cover slip by its edges and rest one edge beside the drop.
- Lower the cover slip at an angle to reduce trapped air bubbles.
- Blot liquid from outside the cover slip if the slide is flooded.
One drop is usually more manageable than a large puddle. The Georgia Extension activity notes that excess water gives fast swimmers more room to escape the field, while a smaller volume can make them easier to follow.
Do not press down on the cover slip to restrain organisms. If a specimen is thick enough to lift the cover slip substantially, make a thinner mount with less debris.
Find the sample at low power
Place the slide on the stage and begin with the lowest-power objective. Center the edge of a visible piece of debris over the illumination opening; that edge can provide an easy focus target.
While viewing the stage from the side, bring the objective into a safe starting position according to the microscope instructions. Look through the eyepiece and use coarse focus at low power to locate the sample, then fine focus to sharpen it. Adjust the transmitted light so transparent features have contrast instead of disappearing into a bright background.
Scan the slide in overlapping rows. A repeatable left-to-right, step-down, right-to-left pattern covers more of the wet mount than random movements. Pond organisms often gather near debris, bubbles, and the cover-slip edge, so pause at those boundaries.
When you find an interesting subject, center it before changing objectives. Move upward one objective at a time and use fine focus. Never force a focus control or allow an objective to strike the slide. The microscope magnification guide explains why higher power reduces the visible field and makes tracking a moving subject harder.
Recognize broad groups without overclaiming
Identification is easier when you first describe what you actually see. Record shape, color, approximate size relative to the field, movement, and association with debris before choosing a name.
Common broad observations include:
- Algae: green or golden cells that may appear alone, in colonies, or as long filaments. Not every green object is algae, and not all algae are green.
- Ciliates and other protists: mostly single-celled organisms with varied outlines. Some move smoothly or rapidly, while others attach to a surface.
- Rotifers: multicellular animals whose moving cilia can create the impression of rotating wheels near the head.
- Small crustaceans: larger, often transparent animals with visible appendages and internal movement.
- Nematodes: slender, unsegmented animals that often move with a whipping motion.
- Debris and artifacts: fibers, plant pieces, crystals, air bubbles, and scratches can all resemble biological structures at first.
Movement is informative but not proof that an object is alive. Brownian motion can make very small particles jitter, and water currents caused by evaporation can carry nonliving debris across the field. Likewise, an organism that is temporarily still is not necessarily dead.
Use an identification key from a university or museum when you want to narrow the group. Preserve uncertainty in your notes with terms such as “possible ciliate” rather than forcing a species-level identification from an unclear view.
Improve contrast and follow moving subjects
If the field looks pale, reduce illumination slightly and adjust the condenser or iris diaphragm if the microscope provides those controls. Small transparent subjects can become easier to see when the background is not overpoweringly bright.
Rice University's microscopy guidance notes that dark-field illumination can help with an initial survey of pond-water samples because suspended cells and particles appear bright against a dark background. True dark-field performance depends on the optical setup, however. Do not insert improvised material where it could touch hot components, interfere with moving parts, or contaminate an objective.
To follow a moving organism, stay at low or medium power and move the slide gradually in the direction the organism is traveling. Higher magnification is not automatically better; it narrows the field and gives the subject less time before it swims out of view.
Photograph and record the observation
A simple field note can include the collection location, date, part of the container sampled, objective used, illumination setting, and a sketch. Capture several fields rather than treating one photogenic drop as representative of the pond.
If using a phone adapter, focus the microscope before attaching the phone, center the active camera over the eyepiece, and record short videos for moving subjects. The guide to taking microscope pictures with a phone covers alignment, exposure, vignetting, and vibration in detail.
The Wevision M1 and M2 are compound microscopes with objective progressions suitable for starting at low power and moving upward as the subject requires. The M2 also includes a smartphone adapter. Review their documented differences on the microscope comparison page rather than selecting a model by maximum magnification alone.
Finish without spreading the sample
When the session is complete, follow local or classroom instructions for disposal. Do not move living material from one pond to another. Clean reusable slides as directed, discard damaged cover slips in an appropriate sharps container, wipe the work surface, and wash your hands.
Pond-water microscopy works best as a repeatable observation rather than a hunt for one promised organism. Use a small wet mount, scan systematically, describe before identifying, and compare samples across locations or dates. The variation is part of the lesson: one drop is a view into a community, not a complete census of it.
Sources
Explore Wevision microscopes
Find the right microscope for your next observation
Visit the Wevision web store to explore current microscope models for learning, laboratories, classrooms, and hands-on discovery.
Visit the Wevision web store