
Smartphone microscopy guide
How to take microscope pictures with a phone
A clear phone image starts with a well-focused optical view, careful camera alignment, steady support, and restrained camera settings.
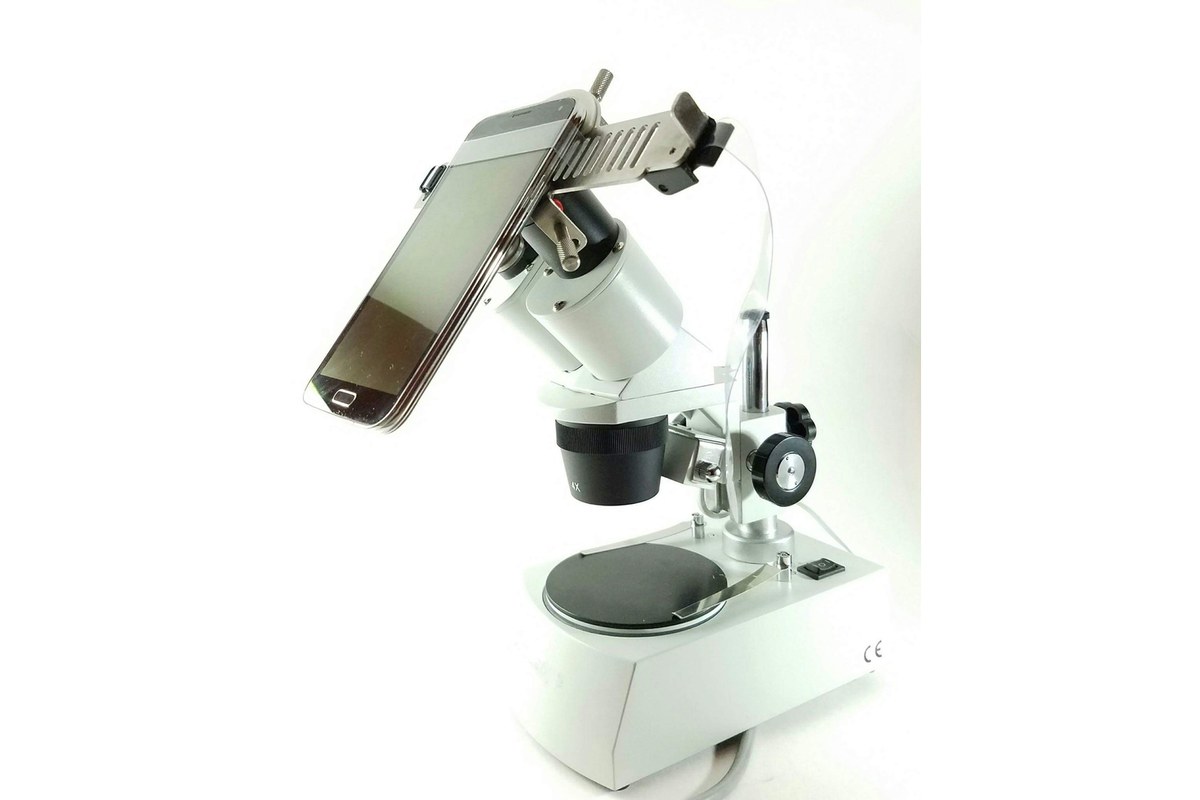
Build the microscope image first
Learning how to take microscope pictures with a phone is mostly an exercise in controlling the optical path. The microscope forms the detailed image; the phone records that image through the eyepiece. A camera cannot restore detail that was never resolved by the objective or correct a specimen that is out of focus.
Begin without the phone attached. Select the lowest-power objective, place the slide securely, and center the feature you want to photograph. Use coarse focus only at low power, then sharpen the view with fine focus. Adjust the illumination until important details are visible without washed-out highlights.
Move to a higher-power objective only if the subject needs it. Re-center before switching and use fine focus at higher power. If the subject disappears, return to low power and begin again. Never force a focus control or allow an objective to strike the slide.
If total magnification and useful detail are still unfamiliar, review microscope magnification explained before setting up the camera.
Gather a simple, stable setup
For routine smartphone photomicrography, use:
- a compound microscope and prepared or carefully made wet-mount slide;
- a clean eyepiece, objective, and phone camera lens;
- a compatible smartphone-to-eyepiece adapter;
- the phone's standard camera app;
- a stable table that will not move when the shutter is pressed.
An adapter matters because the phone camera must remain centered over the eyepiece at a repeatable distance. A 2026 classroom study in the Journal of Microbiology & Biology Education used hands-free phone mounts with both compound and dissecting microscopes. Students used them to record subjects including pond water and prepared slides, and the stable mounts were viewed positively by participating students.
The Wevision M2 includes a smartphone adapter for capturing and sharing observations. It also has dual LED illumination and cord-or-battery power. Compare the current models on the Wevision microscope comparison page; do not assume that an adapter is included unless it is listed for that model.
Align the phone with the eyepiece
Identify the active camera
Many phones have several rear cameras and may switch between them automatically. Open the camera app and cover one lens at a time with a fingertip, without touching the glass, to identify the lens being used at the normal 1X camera setting. Position that lens over the adapter opening.
Avoid starting with portrait, macro, or ultra-wide modes. These modes may select a different lens, add artificial background blur, or change cameras after alignment. The normal photo mode is the most predictable starting point.
Center the exit pupil
Loosen the adapter adjustments, place the phone securely in the holder, and align the active camera over the eyepiece. Attach the adapter gently so it is stable without placing excessive pressure on the viewing tube.
The live view may first show a small bright circle surrounded by black. Move the phone laterally until that circle is centered. Then adjust the phone-to-eyepiece distance, if the adapter allows it, until the visible field becomes as large and even as practical. Dark corners are called vignetting. Slight vignetting can be cropped later, but an off-center crescent usually signals poor alignment.
Tighten one adjustment at a time and recheck the image. A tiny shift can matter because the phone lens and microscope eyepiece are both small relative to the holder.
Refine focus and illumination with the phone attached
Once the camera is aligned, use the microscope's fine-focus control while watching the phone screen. Tap the important feature on the screen to tell the phone where to focus and meter exposure. If the camera repeatedly hunts for focus, use focus lock or manual focus when the phone offers it.
Adjust microscope illumination before using digital exposure controls. Too much light can erase transparent detail and clip bright areas to pure white. Too little light forces the phone to use a longer exposure or stronger electronic gain, which can introduce blur and noise. Evident Scientific's photomicrography guidance emphasizes that the quality of a recorded image depends on the quality of the microscopy and illumination established before capture.
Try these adjustments in order:
- Focus the specimen optically with fine focus.
- Adjust the microscope light for visible contrast.
- Tap the subject on the phone screen.
- Lower the phone exposure slightly if bright areas have no detail.
- Use only modest digital zoom to crop dark edges, if necessary.
Pinch-to-zoom enlarges the phone's sampled image; it does not increase the resolving power of the objective. Crop after capture when possible so you retain more of the original image.
Prevent shake and motion blur
At microscope scale, movements that feel insignificant can soften the result. Do not hold the phone by hand over the eyepiece for an important image. Let the adapter carry the phone, keep its charging cable from tugging on the mount, and avoid leaning on the table.
Use a two- or three-second shutter timer, a wired headset shutter if supported, or a remote control. These methods let vibration settle before exposure. For a live wet mount, however, the specimen itself may move. In that case, brighter but controlled illumination and a shorter exposure can be more useful than a timer.
Capture several frames. Fine focus may pass through different levels of a thick specimen, and a moving organism may be sharp in only one image. Record short video clips when movement is the observation rather than a distraction.
Troubleshoot common phone-microscope problems
| Problem | Likely cause | What to try |
|---|---|---|
| Bright crescent or clipped circle | Phone camera is off-center | Reposition the active lens over the eyepiece |
| Small circle with wide black border | Camera is too far from the eyepiece | Reduce the gap carefully, then re-center |
| Image switches or goes black | Phone changed to another rear camera | Return to standard 1X mode and realign |
| Soft image everywhere | Optical focus, dirty glass, or vibration | Refocus without the phone, clean correctly, and use a timer |
| Sharp center but soft edges | Optical mismatch or field curvature | Compose around the center and avoid excessive zoom |
| Pale, low-contrast specimen | Illumination is too strong or poorly adjusted | Reduce brightness and refine the condenser or diaphragm if available |
| Noisy or streaked moving subject | Exposure is too long | Add controlled light and capture a shorter exposure or video |
Clean only with material intended for optical surfaces. A fingerprint on the phone lens can reduce contrast just as readily as debris on an eyepiece. Do not disassemble microscope optics for routine cleaning.
Record enough information to make the image useful
A microscope photo is more valuable when someone can understand how it was made. Keep the uncropped original and note:
- the specimen and preparation method;
- the objective and eyepiece magnifications;
- whether the image was cropped or digitally zoomed;
- the date and any relevant lighting adjustment;
- the phone and adapter used when comparing repeated sessions.
Do not calculate specimen size from a phone image unless the imaging setup has been calibrated with an appropriate stage micrometer at that exact objective, camera, and crop setting. Changing digital zoom or camera resolution changes the pixel scale.
For student work, phone capture is useful for documenting observations, comparing slides, and discussing technique. It is not a substitute for following a laboratory protocol, and an educational image should not be presented as a medical diagnosis. The broader student microscope guide explains where documentation features fit among optics, focus controls, and stage movement.
Use a repeatable capture sequence
For consistent results, focus and light the slide first, identify the phone's active camera, center it over the eyepiece, refine with fine focus, and then control exposure. Stabilize the setup and capture several originals before cropping. Once those steps become routine, a smartphone can turn an individual microscope observation into a record that is easier to review, compare, and share.
Sources
Explore Wevision microscopes
Find the right microscope for your next observation
Visit the Wevision web store to explore current microscope models for learning, laboratories, classrooms, and hands-on discovery.
Visit the Wevision web store