
Seasonal pollen microscopy guide
Pollen under a microscope: a fall observation guide
Early fall brings pollen back into the conversation. A microscope can make its varied shapes visible, but a useful observation starts with a known sample and careful preparation.
Connect the September season to a clear question
Pollen is a timely early-September microscopy subject. UMass Amherst Extension's September 4, 2026 landscape report describes ragweed blooming in Massachusetts and explains the difference between wind-carried ragweed pollen and the less airborne pollen of conspicuous goldenrod flowers. That is a regional observation, not a forecast for every reader's location.
For a classroom or home activity, start with a narrower question: How do pollen grains from two known samples differ under the same microscope settings? You do not need to collect ragweed or reproduce an outdoor monitoring station to explore that question.
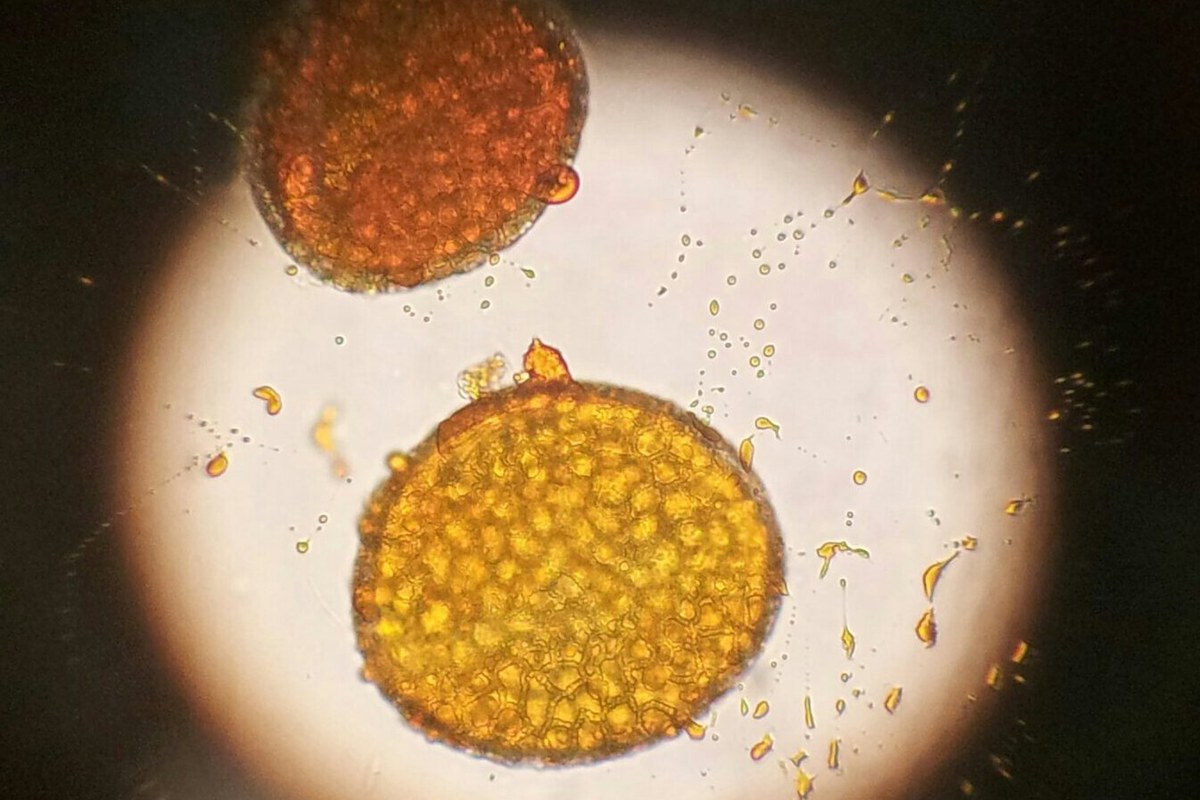
The guide image shows lily pollen in water, as identified by its photographer. It illustrates one preparation and should not be used as a reference image for ragweed.
Begin with a known, covered sample
A commercially prepared, labeled pollen slide is the simplest starting point. It lets beginners practice focusing and comparison without handling loose pollen or choosing a mounting medium. Keep the cover slip and any seal intact.
If preparing fresh material, use a teacher-selected flower from a known, permitted source. Record the plant name and the part sampled. Avoid gathering unidentified airborne dust as your first specimen: it can contain pollen alongside fibers, mineral particles, and other debris.
Pollen-sensitive participants should use intact prepared slides or existing images instead of collecting loose pollen. Do not shake, blow, or sniff a sample. Keep the work area away from food, supervise children using glass, and follow classroom handling rules.
Make a small wet mount if the lesson calls for one
Arizona State University's pollen lesson includes wet mounts and prepared reference slides. For a brief introductory observation, gather a slide, cover slip, water, dropper, and a clean transfer tool approved by the instructor.
- Label the slide with the plant or sample name before adding material.
- Place a small water drop in the center.
- Gently touch the flower's pollen-bearing anther with the tool and transfer a trace into the drop. Avoid making a visible cloud of dust.
- Lower the cover slip gradually from one edge to limit bubbles.
- Check for separated grains. If the field is packed with clumps, remake the mount with less material.
- Record that this is a fresh water mount and note when it was prepared.
Water is a temporary observation medium. Hydration and preparation can change pollen shape, so a fresh water mount is not directly equivalent to a dry grain or a stained permanent reference slide. If the lesson needs a permanent mount, use an established educator-led protocol rather than improvising solvents, stains, or heating.
Survey at low power, then inspect one grain
Use transmitted illumination and start with the lowest-power objective. Find a region with a few separated particles, bring their edges into focus, and center a likely grain.
With a 10X eyepiece, a 4X objective gives 40X total magnification for locating the sample. A 10X objective gives 100X for a closer survey, while a 40X objective gives 400X for inspecting a selected grain. What you resolve depends on the pollen type, preparation, optics, and lighting.
Use fine focus at higher power. Watch objective clearance from the side, never force the controls, and never let an objective strike the cover slip. If the target disappears, return to low power and re-center it. This introductory comparison does not require oil immersion.
Read the magnification guide if objective power and total magnification are unfamiliar. Enlarging the view beyond the optics' useful range does not reveal additional structure.
Compare shape at several focal levels
A pollen grain is three-dimensional, while a sharply focused microscope image shows only a limited depth at once. Slowly move fine focus through the grain and compare its surface with its outline nearer the middle. A feature that disappears at one level may become clearer at another.
Microscopy UK's pollen observations show how viewing orientation and hydration affect appearance. This is why one photograph may be a poor match for another photograph of the same type of pollen.
Keep descriptions simple:
| Feature | Useful observation |
|---|---|
| Outline | Rounded, elongated, angular, or visibly collapsed |
| Surface | Apparently smooth, textured, or spiny at the available resolution |
| Openings | Possible pore or groove, with location and uncertainty noted |
| Arrangement | Separate grains, pairs, groups, or an indistinct clump |
| Consistency | Similar forms in several fields, or only one unusual particle |
Do not turn “apparently smooth” into “has no surface texture.” Fine features can be beyond the instrument's resolving ability or hidden by the preparation.
Treat identification as a working hypothesis
Penn State's pollen microscopy lesson encourages students to compare forms and make sketches. It explicitly treats matches to reference images as tentative rather than positive identifications.
For a sample from a known flower, distinguish the plant's identity from the identity of every particle on the slide. Contamination and mixed material are possible. A reasonable record is “rounded grains observed in the sample collected from this flower,” followed by the evidence supporting a closer match.
Keep preparation methods consistent when comparing two samples. Use separate clean tools, similar amounts of material, the same objectives, and comparable lighting. Examine several fields rather than selecting only the most striking grain.
The microplastics observation guide explores a related microscopy skill: describing an observed particle without claiming more than the method can establish.
Read microscope images in context
Highly detailed pollen pictures may come from a scanning electron microscope. NC State's pollen lesson uses electron micrographs to teach shape and scale. Their surface detail and depth should not be treated as a promise of what an ordinary classroom light microscope will show.
For your own photos, focus through the eyepiece first and attach the camera afterward. Capture an overview and a closer view, retaining the originals. Add the sample, preparation, objective, eyepiece, and any digital crop. The phone microscopy guide covers alignment and steady capture.
Only add a size measurement or scale bar if the imaging setup has been calibrated. A larger on-screen grain may reflect a different crop or camera setting.
Keep the conclusion tied to the slide
A count of grains in a classroom field describes that field. It cannot establish the outdoor concentration in grains per cubic meter, which would require a defined air-sampling method and known sampled volume. It also cannot diagnose an allergy or determine whether exposure is safe for someone.
Finish by recording the clearest differences between the samples and one uncertainty that remains. Remove the slides, store prepared specimens in their case, dispose of temporary preparations under classroom rules, and wash hands. The useful result is a documented comparison of pollen forms that another observer can understand and repeat.
Sources
- UMass Amherst Extension: Landscape Message, September 4, 2026
- Penn State Center for Pollinator Research: Pollen Microscopy Lesson Plan
- Arizona State University STEM Acceleration Project: Pollen Microscope Plating
- Microscopy UK: Studying Pollen, by Dave Walker
- NC State Research Triangle Nanotechnology Network: Pollen Microscopy Lesson
- Nikon MicroscopyU: Useful Magnification Range
Explore Wevision microscopes
Find the right microscope for your next observation
Visit the Wevision web store to explore current microscope models for learning, laboratories, classrooms, and hands-on discovery.
Visit the Wevision web store