
Cell measurement guide
How to measure cells under a microscope
Magnification tells you how much larger a cell appears. To measure its size, first compare your viewing scale with a reference of known length.
Choose one dimension to measure
The result of this guide is a cell length in micrometers, with a recorded calibration and a repeat check. Calibration means finding the real distance represented by one division of your viewing scale. One millimeter equals 1,000 micrometers. The symbol for a micrometer is µm.
Choose a thin prepared specimen with clear cell boundaries. Decide what you will measure before starting. For example, measure the longest visible distance across one cell. Use that same definition for every cell in the exercise.
A flat onion peel is a useful practice specimen. The onion cell guide explains how to prepare it. Overlapping tissue or unclear edges will make measurements less reliable.
Gather a scale and a known reference
For the eyepiece method, you need:
- A compound microscope with a compatible measuring eyepiece.
- An eyepiece reticle, also called a graticule, with visible scale divisions.
- A stage micrometer with a documented scale.
- A specimen slide and a notebook.
A stage micrometer is a slide with a small ruler of known spacing. The eyepiece scale has arbitrary divisions until you calibrate it. Idaho State University explains why the value of each eyepiece division changes with the objective.
Check compatibility before inserting a reticle or replacing an eyepiece. Follow the equipment instructions. Do not assume that an ordinary eyepiece already contains a measuring scale.
Read the micrometer's markings and documentation. Do not assume every small interval is 10 µm. A printed paper ruler is not a suitable reference for small cell measurements.
1. Focus and align the scales
Place the stage micrometer on the stage. Start at low power and locate its engraved ruler. Follow the microscope instructions and keep the objective clear of the glass.
Select the objective you will use to measure the cells. Adjust the measuring eyepiece so its scale is sharp. Focus the micrometer scale too. Use fine focus at higher power.
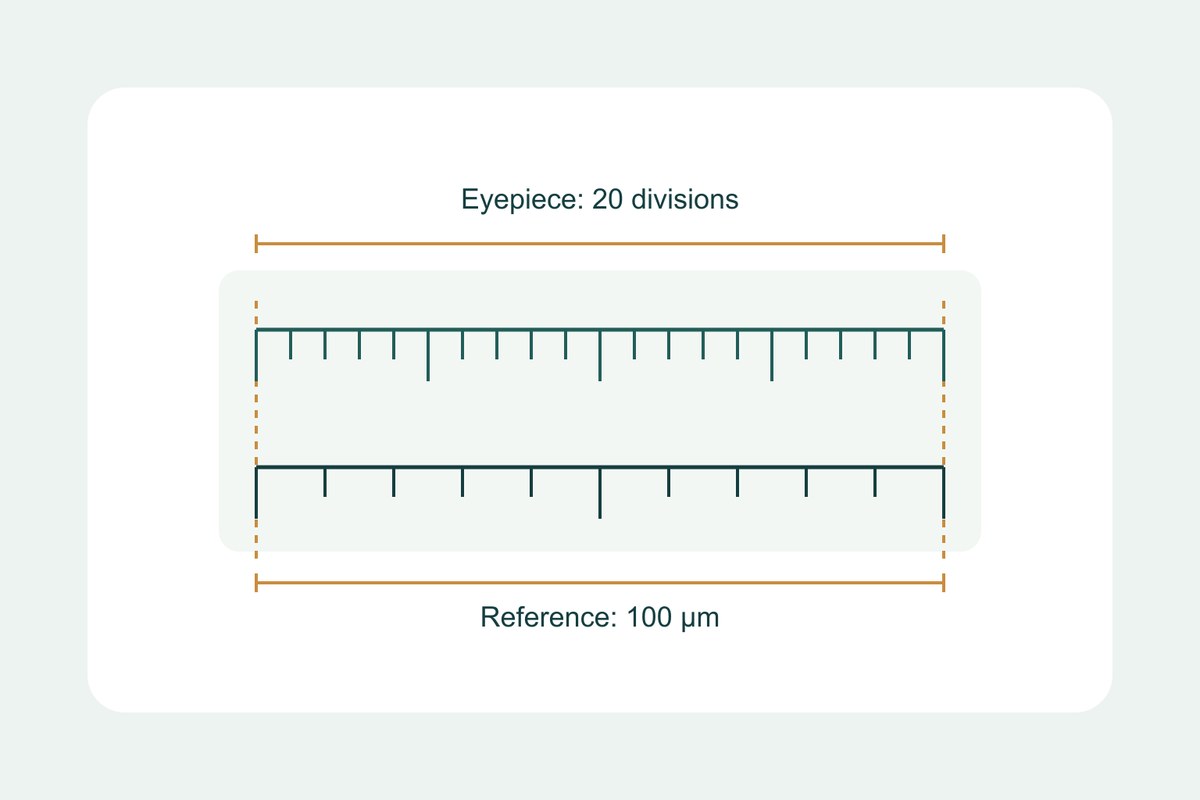
Bring the scales parallel. Align one eyepiece mark with one micrometer mark. Find a second clear alignment farther along the scales. Use a long span that remains clearly visible. Nikon's calibration tutorial describes this two-point comparison.
Count the spaces between the marks, not the marks themselves. For example, the span from mark 0 to mark 20 contains 20 divisions. Write down the two endpoints before calculating.
2. Calculate the value of one division
Use this calculation:
Micrometers per eyepiece division = known micrometer distance ÷ eyepiece divisions across that distance.
Here is an example. These values are for practice and must not replace your own calibration:
| Quantity | Example value |
|---|---|
| Documented stage interval | 10 µm |
| Number of stage intervals | 10 |
| Known total distance | 100 µm |
| Matching eyepiece divisions | 20 |
| Value of one eyepiece division | 100 ÷ 20 = 5 µm |
The calculation uses the entire matched distance. Do not divide by the printed number at an endpoint unless that number also equals the number of intervals counted.
Rice University's measurement guide explains how a calibrated reticle converts a visible span into a real length. Write the conversion beside your raw readings so another person can check it.
3. Check the conversion before measuring cells
Move the reference slide and choose another clear span. Calculate its length using your conversion. Compare that result with the micrometer's known distance.
If the results disagree beyond your ability to read the lines, check units, interval counts, and alignment. Repeat the calibration. Do not continue with a conversion you cannot reproduce.
Record the microscope, objective, eyepiece, reference slide, date, and calculated value. Calibrate each objective separately. Repeat the check after changing the optical setup. The magnification guide explains the objective and eyepiece relationship, but total magnification alone is not a measured scale.
4. Measure a cell with the same setup
Replace the micrometer with the specimen. Keep the same objective and measuring eyepiece. Focus a clearly bounded cell near the center of the field.
Align the scale with the dimension you chose. Record its reading at each end of the cell, then subtract the first reading from the second. Multiply that span by the value of one division.
For the example above, a span of 12 divisions gives:
12 divisions × 5 µm per division = 60 µm.
Move away from the cell, find it again, and repeat the reading. Keep both results. If an edge is uncertain, record that limitation instead of adding decimal places to make the result appear precise.
Nikon's micrometry guide explains how edge appearance, optical distortion, and scale alignment affect measurements. A sharp calibration does not remove uncertainty from a blurred cell boundary.
Use a separate calibration for camera images
An eyepiece conversion does not automatically apply to a phone photograph. Photograph the micrometer with the same objective, camera lens, adapter position, image dimensions, and zoom settings as the specimen. Keep both original files. The phone photography guide helps with stable capture.
In ImageJ, draw a straight line over a known distance in the reference image. Use Analyze > Set Scale, enter the known distance, and set the unit to um. The ImageJ documentation describes these controls.
For the matching specimen image, apply the same pixel-to-distance values through Set Scale. Keep Global unchecked to avoid changing unrelated images. Draw a line across the cell and use Analyze > Measure.
Check another known reference span before accepting the result. Capture a new reference after changing the imaging setup. Resizing changes the distance represented by a pixel. Avoid resized copies during this exercise.
Finish with a measurement record
Measure three clearly bounded cells for practice. Record each raw span, conversion, calculated length, and repeated reading. Three cells are a small exercise, not a reliable description of an entire population.
Keep a sketch or photograph that identifies the measured dimension. Note any unclear edge or damaged cell. If you cannot check the calibration, report only the raw scale divisions and the missing information.
A useful final record lets someone repeat your calculation and understand its limits. The measurement is complete when the reference check works, the cell edges are defined, and the units are stated.
Sources
Explore Wevision microscopes
Find the right microscope for your next observation
Visit the Wevision web store to explore current microscope models for learning, laboratories, classrooms, and hands-on discovery.
Visit the Wevision web store