
Starch granule observation guide
Potato starch under a microscope: find and compare granules
A potato contains small starch granules that store food for the plant. A thin water mount lets you study separate granules without preparing a tissue section.
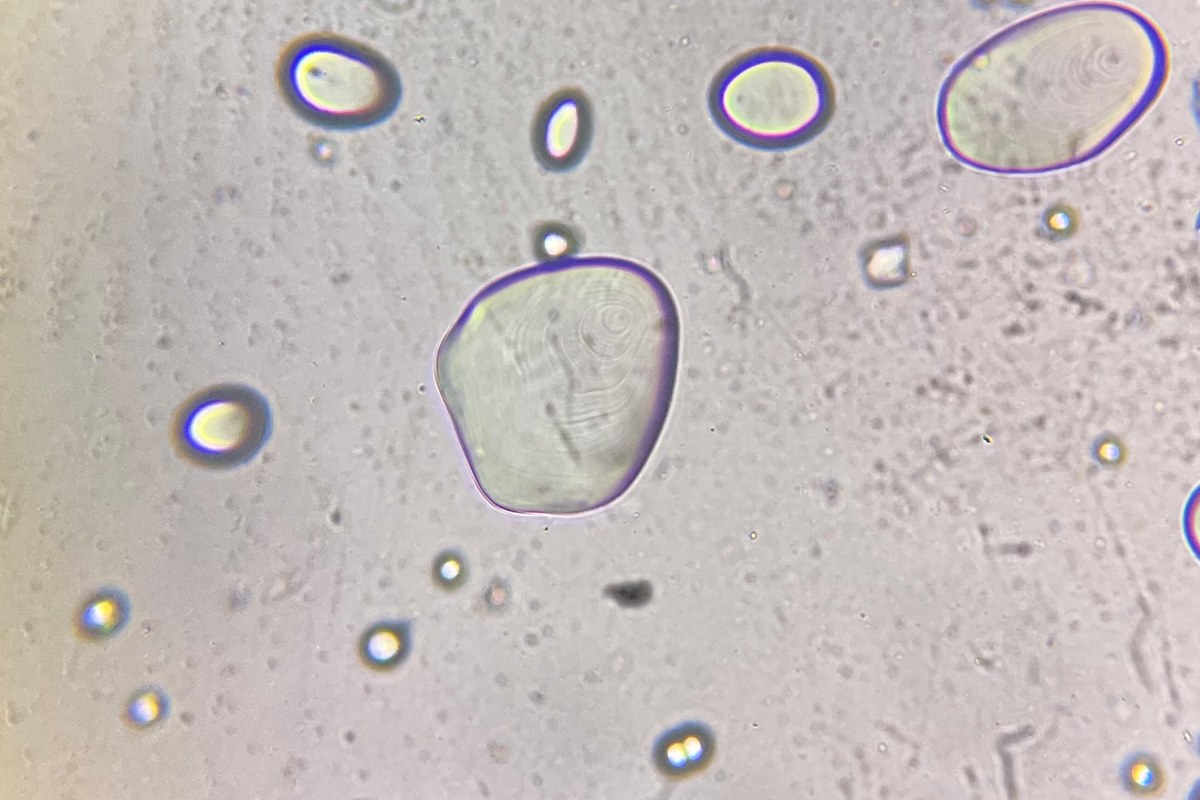
Set a result you can check
Prepare a slide with separate starch granules from a known potato sample. Find five clear examples and draw their outlines. Record whether any internal rings are visible. A second slide will help you check whether the preparation gives a similar view.
A starch granule is a small store of starch inside plant tissue. A loose granule is not a whole potato cell. This activity examines the granules released from the tissue. It does not aim to show the cell walls or nuclei.
Use an uncooked potato for the first session. Heating starch in water can make the granules swell and lose their original structure. Keep that change out of your first comparison.
Gather a known sample and clean tools
You will need:
- A compound microscope with light that passes upward through the slide.
- Two clean slides and coverslips.
- A dropper, water at room temperature, and a small clean dish.
- A fresh potato piece and a clean spoon.
- A pencil, notebook, and timer.
An adult should cut the potato before the activity. Use the spoon to collect a little material from its cut surface. You do not need a blade at the microscope. Keep the tools separate from food preparation, and discard the sample after use.
Plain potato starch from a labeled food package is another option. Check that it is starch, rather than potato flour or a seasoned mixture. Record the product name. Compare fresh potato and packaged starch only as two separate, labeled samples.
Make a thin starch suspension
A suspension is a liquid that contains small solid particles. Your aim is to release a few granules into water. A thick paste will hide their edges.
- Put a small amount of water in the clean dish.
- Gently scrape a little moist material from the potato's cut surface with the spoon.
- Mix that material into the water. Start with a trace, rather than a spoonful.
- Stir gently before taking a drop. Granules can settle while the dish stands.
- Put one small drop on a labeled slide and lower a coverslip over it.
The slide preparation guide explains how to lower the cover and limit trapped air. Keep the underside dry before putting the slide on the stage.
If you use packaged starch, mix a trace into water in the same way. Record which preparation you used. Do not add hot water, iodine, or another liquid to the first slide.
Find separate granules before studying detail
Start with the lowest-power objective. With a 10X eyepiece and a 4X objective, total magnification is 40X. Find the covered drop and scan slowly for a thin region.
Look for clear or pale particles with rounded, oval, or uneven outlines. Plant fragments may also be present. If the field is crowded, mix a drop of your suspension with more water in a separate dish. Make a fresh slide from that diluted sample.
Center a separate granule before changing to the 10X objective. Use the 40X objective only if the microscope and slide permit it. With a 10X eyepiece, those objectives give 100X and 400X total magnification.
Follow the microscope instructions for focus. Watch from the side when checking clearance, and keep every objective clear of the cover. Use fine focus at higher power. This activity does not require immersion oil.
Compare the outline and internal pattern
Adjust the light until the outline is clear. If the microscope has an aperture diaphragm, make small changes and compare the view. Closing it too far can remove fine detail. More magnification alone will not make a weak feature clear.
Use this record for each of your five examples:
| Feature | What to record |
|---|---|
| Outline | Round, oval, or another drawn shape |
| Relative size | Smaller or larger than nearby granules at the same setting |
| Internal rings | Visible, uncertain, or not visible |
| Internal point | Visible position, or not visible |
| Surrounding material | Separate granule, overlapping granules, or tissue |
Some granules show curved internal layers called lamellae. An internal point called the hilum marks the center of granule formation. It can be away from the geometric center. Neither feature will be clear in every granule or at every focus setting.
Use these terms only when the view supports them. A faint mark can remain uncertain. Granule shape and internal detail also depend on orientation. One flat view does not show the full three-dimensional shape.
Keep special image effects separate
Some published starch images show bright crosses against a dark background. These images use crossed polarized light. Two suitable filters control the light before and after it passes through the specimen.
An ordinary bright-field view does not produce that same effect. The photo above shows granule outlines and internal rings. It is a reference image from another microscope, rather than a promised result for your setup.
Iodine staining is also a separate method. It can increase contrast, but a strong stain can hide internal detail. Leave staining to an approved classroom procedure. You can complete this activity with water and an unstained sample.
Repeat the observation on a second slide
Stir the suspension gently and prepare another thin mount. Use the same objective, eyepiece, and light settings. Find five more separate granules and use the same record.
Keep apparent size comparisons within the same magnification. For actual lengths, follow the calibration steps in the microscope measurement guide. Magnification by itself is not a measuring scale.
Draw one granule from each slide. For a photo record, use the phone photography guide. Keep the original image and write down the objective used.
Your result is two labeled records with clear outlines and honest notes about internal detail. Ten selected granules cannot identify an unknown powder or describe every granule in a potato. Remove the temporary slides, clean the work area, and wash your hands.
Sources
Explore Wevision microscopes
Find the right microscope for your next observation
Visit the Wevision web store to explore current microscope models for learning, laboratories, classrooms, and hands-on discovery.
Visit the Wevision web store